 Chapter
Twelve Aye
Chapter
Twelve Aye
Installing
Camac Levers
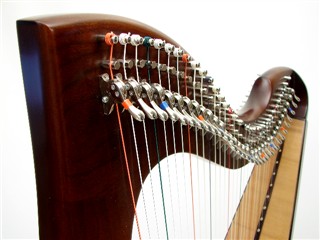
Camac levers have become very popular
over the last few years here in the
First
consideration; Can I use these on my harp?
Camac Levers will usually fit on harps
that accommodate the other popular brands (
|
String |
String Length (Inches) |
|
|
1 |
4.8 |
.82 |
|
3 |
5.9 |
.82 |
|
6 |
7.9 |
.85 |
|
10 |
11.0 |
1.02 |
|
13 |
13.7 |
1.10 |
|
17 |
18.3 |
1.54 |
|
20 |
22.7 |
1.7 |
|
24 |
28.5 |
1.9 |
|
27 |
32.5 |
1.9 |
|
31 |
37.7 |
2.0 |
|
34 |
41.6 |
2.0 |
It seems that Camac levers require less
space for mounting room at the bass end than most other brands. If you are retrofitting Camac Levers onto an existing harp, there
are two issues you may want to consider;
·
Will the bridge pin holes need to be
filled? Camac Levers come with
factory threaded bridge pins that can be raised and lowered by screwing them in
and out. Generally the bridge pins
come in three different sizes, and the small and medium sized pins (H6, H7)
require a holes that are smaller than the traditional 5/32 bridge pin used in
many harps (see the table in section on drilling the neck). If you want to use the Camac factory
bridge pins, you will usually need to fill and re-drill the bridge pin the
holes for about 2/3 of the levers.
·
Will the screw holes for the levers
need to be filled? The screws for
the Camac usually fall directly under the string.
Ordering
the levers
You can order the levers by emailing
the string specification (length, gauge and composition) to Camac. Most orders seem to arrive to the
Tools
There are a couple of specialized tools
that can facilitate mounting these levers.
Camac expects you to drill metric holes for the bridge pins. I could not find metric bits, but
found that a set of numbered bits are entirely adequate to the task. The bridge pins can be driven with small
metric socket wrenches, but purpose built drivers make the job much quicker and
easier. The screws that Camac
sends to hold the levers to the neck are interesting. They can be driven with a plain, flat
blade screwdriver, or a T8 torx driver. The Torx driver does not require
as much down pressure, won’t slip out of the slot (and mar the finish on
the neck), and can put a lot more torque on the screw. Luckily you can get all of these items
from MSC
|
Item |
MSC
Stock # |
Price |
|
4mm
nut Driver |
84973734 |
$6.46 |
|
5mm
nut Driver |
84973759 |
$6.61 |
|
6mm
nut Driver |
84973775 |
$6.80 |
|
T8
Torx Driver |
05059084 |
$3.65 |
|
Jobber
Drill Bits, #1-60 |
01176601 |
$63.97 |
At $64, the Jobber bit set is not
cheap. The set of bits run from
.040” (#60) to .228” (#1), with a bit every .002-.006”. I balked at the price initially, but
once I had them, they proved invaluable for many, many other common shop
tasks. They are great for
drilling precisely sized holes for eyelets. You can drill precise pilot holes for
taps. You can fit small dowels,
nails and pins with sliding or snug interference fits. Once you have them, you will wonder how
you ever got along without them.
If you are selling the harp to a client
that will need to regulate their own harp, you may want to provide them with a
set of four drivers.
Drilling
the neck
The holes in the neck for the bridge
pins must be drilled in two steps, a hold for the flat shank of the pin and a
smaller, deeper hole for the threaded portion.

I find the holes end up more concentric
if I drill the deeper hole for the thread first. Then I let the larger bit for the shank
center itself within smaller “pilot” hole. If you don’t have an accurate,
reliable depth stop that you can set on your drill press, I would recommend you
use a strip of tape around the drill bit to precisely control the depth of the
holes. You want the shank hole and
thread hole to be about an 1/8 “ deeper than they are on the bridge
pin. I know this because I have
been halfway through levering and had a dozen pins prematurely bottom out as I
tried to regulate the levers. It is
a real pain to have to take off the string, unscrew the bridge pin, redrill the
holes, and put everything back together.
You want the Shank hole to be the same
size as the pin shank. For the
threaded portion, I select bits that are .006-.008” under the major
thread diameter for the medium (H6) and large (H7) pins. H6 and H7 pins are thick enough that one
can safely apply considerable torque to drive them in. The smallest H5 pins are delicate. The
pins appear to be made from some brass alloy, plated with nickel. I snapped one off, right between the
shank and threaded section. There
is no good way to remove the threaded section and it is really frustrating to have to leave a piece of metal in the neck,
preventing you from placing the a second bridge pin right were it should
be. For those of you
without a micrometer or dial caliper, there are the sizes I use to drill the
holes for the bridge pins in cherry:
Diameter and
|
|
Small (H5) |
Medium (H6) |
Large (H7) |
|
Thread |
#31 x 1” |
#25 x 1.28” |
#13 x 1.31” |
|
Post |
#25 x ½” |
#12 x 0.65” |
15/64 x 0.69” |
If you are building a harp from Rock
Maple, Wenge or other really hard wood, you may want to go up a size or
two. The best guide is to drill
test holes in scrap and screw the pin all the way in. You want it to screw in with moderate
resistance.
Camac usually sends a few extra bridge
pins, and there may be some confusion as to how many H5, H6, and H7 pins should
be used. If you carefully look at
the base of the levers, you will find three different sizes. Small, medium and Large bridge pins
correspond with a commensurately sized lever base. On most of my harps, the middle sized
pins (H6) are used for strings 16-23 or so.
Driving three dozen pins into the neck
can be a tedious work. I took
a piece of 3/8” steel and ground the end to a square that would fit my 4,
5 and 6mm sockets. This
allows me to use an electric drill to do most of the work. I am careful to stop the drill 1/8 inch
or so before the hexagonal shoulder on each pin touches the neck.
After the harp is built, finished and
has been held to tune for a week or two, I mount the levers.
Mounting
the levers
To determine their position, you will
need to hold the Camac Levers in place with considerable force. This is impossible to do with the harp
standing vertical. Lay the harp out
flat on a table. You will
need gather the following tools:
·
Awl to precisely mark the centerpoints
for the screws that attach the levers
·
The 4,5,6 mm nut drivers
·
The Torx Nut driver
·
An accurate electronic tuner (I use a
Korg CA-30)
·
Two shop towels or rags to damp the
strings
·
Electric Drill
 The
drill bit to use for the screw holes is going to vary with the type of wood
used in the harp’s neck. If
the harp neck is built of walnut or mahogany, I use a drill bit that is about
.002” under the minor diameter of the screw. When I am working in a very hard woods
like Wenge or Bubinga, I will select a bit that is .002 to .003” less
than the major diameter.
The
drill bit to use for the screw holes is going to vary with the type of wood
used in the harp’s neck. If
the harp neck is built of walnut or mahogany, I use a drill bit that is about
.002” under the minor diameter of the screw. When I am working in a very hard woods
like Wenge or Bubinga, I will select a bit that is .002 to .003” less
than the major diameter.
If you have some scrap, test the bit
you have selected. You want to be
able to drive the screw all the way in with moderate pressure. If the hole is too large, the screw may
strip out before it generates enough force to hold the lever firmly to the
neck. If the hole is to small, the
screw head may break off.
I use a small piece of tape wrapped
around the bit to indicate when the hole is drilled deep enough for the screw.
I would suggest that you start mounting
levers in the mid range the first time you
 Most
of the levers have this configuration when viewed from the side. Note that the string passes about
halfway between the sliding pin and lower fret in this diagram. I refer to this as the neutral position. By twisting the bridge pin you can move
the string so it is high (nearly
touching the sliding pin) or low
(nearly touching the lower fret. On
the large body levers, the “adjustment space” from the low to the
high position is about 4mm, depending on the thickness of the string.
Most
of the levers have this configuration when viewed from the side. Note that the string passes about
halfway between the sliding pin and lower fret in this diagram. I refer to this as the neutral position. By twisting the bridge pin you can move
the string so it is high (nearly
touching the sliding pin) or low
(nearly touching the lower fret. On
the large body levers, the “adjustment space” from the low to the
high position is about 4mm, depending on the thickness of the string.
In the mid-range I place the lever on
the neck, about ½” below the bridge pin and adjust the bridge pin
so the string is in the neutral position. Moving the bridge pin up or down
will usually change pitch of the string.
I don’t usually worry about having each string at concert pitch
while mounting the lever. The goal
is to place the lever so it raises the string’s pitch by one half step
(exactly!) when it is engaged.
After you are done you can retune and strings to concert pitch.
I pluck the first string with the lever
disengaged and note the reading on the meter. It may be spot on, it may be 5 cents
sharp. Let’s say it is
five cents sharp. I engage the
lever and pres firmly and pluck the string a second time. Let’s say the tuner now reads a
half step higher, but 10 cents sharp.
The lever is supposed to raise the string’s pitch exactly one half
step, to 5 cents sharp (remember that initial reading!). The lever makes the string too sharp, so
it needs to be moved up towards the bridge pin, effectively making the string
longer, flattening the string.
If the string were dead on, or five cents flat, I would move the lever
away from the bridge pin.
Most people rapidly develop a good feel for how far a lever should move,
and can get it within 2-3 cents of a perfect half step.
After I am happy with a lever’s
position, I will check to make sure the groove in the lower fret is centered
under the string and the string is running parallel to slots in the base.
 Adjust the height of the
string to the neutral position, then 1. Move the lever up and down to sharpen
or flatten the intonation.
Levers 2 and 3 will not engage or disengage quietly. Lever 2 is pulling the string to
side and needs to be moved to the left. 3. Check to see if the lever is
skewed. 4. The slots should be
aligned with the string.
Check for all three positioning requirements before pricking the divots
and drilling the screw holes in the neck.
Adjust the height of the
string to the neutral position, then 1. Move the lever up and down to sharpen
or flatten the intonation.
Levers 2 and 3 will not engage or disengage quietly. Lever 2 is pulling the string to
side and needs to be moved to the left. 3. Check to see if the lever is
skewed. 4. The slots should be
aligned with the string.
Check for all three positioning requirements before pricking the divots
and drilling the screw holes in the neck.
A good levering job is a precision
game, less than half a millimeter. It pays to take your time and recheck the
lever’s position before marking and drilling holes. Carefully aligning the levers has
cosmetic and acoustic benefits.
Levers skewing to the right and left look like a mess. If a skew lever has to be shifted up or
down to regulate the harp, it will “dink” when it is engaged or
disengaged.
As you drill the hole, for the screws
that attach the lever to the harp, you will have to tug the string to the left,
towards the sound box so the drill bit does not nick the string. The bit may also have the tendency to
flick to the right or left as it is pulled out of the hole. Nicks lead to breakage down the road so
try to keep the strings pristine.
Screw the levers firmly to the
neck. I put the screw on the end of
the torx driver and hold the screw in place with my fingertip. With the other hand I position the lever
while I press the tip of the screw down into the hole. Here again, I pull the string to the
side to keep the threads and head of the screw abrading the strings. If you tighten the first screw all the
way down, then back it off ¼ turn, it will hold the lever in place and
you can use two hands to finagle the second screw into place.
After the screws are in place, I pluck
the string with the lever engaged and then disengaged to check the
intonation. Does the lever raise
the pitch of the string exactly half a step? Even an experienced leverer will
need to fine tune many of the strings. There are two effective ways to
fine tune Camac levers;
1). You can loosen the screws ¼
turn and shift the lever up and down on the neck
2. You can use the nut drivers to screw
the bridge pin in or out.

In the neutral position,
the lever pushes the string down 3.8 mm as it is engaged

If you move the bridge pin
to the low position, the lever only has to push the string down 2.2mm when it
is engaged. Because the lever doesn’t have to push the string as far, it
won’t raise the pitch as much as it does when the string is in a neutral
or high position.

If you move the bridge pin
to the high position, the lever has to push the string down 6.2mm. This will raise the pitch much more that
it does when the bridge pin is left in a
neutral or low position.
 The screws holding the
levers to the neck are narrower than the slots machined into the fret. They have a half a little bit of
play. Small misalignments can
frequently be corrected by disengaging the lever and loosening the screws. Push against the lever while each the
screws are tightened. When
you get to the smallest levers, you will find they don’t have a lower
fret. These levers have a groove in
the sliding pin. When it is
misaligned it will go “dink” too. The fix is the same.
The screws holding the
levers to the neck are narrower than the slots machined into the fret. They have a half a little bit of
play. Small misalignments can
frequently be corrected by disengaging the lever and loosening the screws. Push against the lever while each the
screws are tightened. When
you get to the smallest levers, you will find they don’t have a lower
fret. These levers have a groove in
the sliding pin. When it is
misaligned it will go “dink” too. The fix is the same.
Mount more levers towards the bass
end. You will find that you can
accurately forecast the appropriate spot for the next lever by placing it the
same distance away from the bridge pin as the last lever.
Realize that bridge pin in an extremely
high or low position are more likely to buzz, so try to improve your placement
accuracy, so the string remains close to the neutral position and only need to
make fine tuning adjustments with the bridge pin.
Levering Bass Strings
The sliding pin on the lever is trying
to push the string down when the lever is engaged. As you come to the strings with 40 and
50 lbs of tension, you will have to push down quite forcefully with one hand to
hold them firmly to the neck while plucking with the other. This is probably the toughest part of
Camac levering. A few tips;
1.
The upwards force of the string on an
engaged lever will be less if you start with the string in a position a smidge
closer to the low position from neutral.
2.
I don’t worry too much about skew
and centering the string over the fret groove while the lever is engaged. I find the sweet spot where the lever is
raising the string a half step, then finesse the right/left alignment with the lever disengaged.
3.
Bass strings are long, and harmonics
can make the indicator on the tuner dance around. Damping the other strings and plucking
the string at the middle will make the readings more consistent and accurate
4.
As you move from the monofilament to
wound strings, there are significant changes in string diameter from string to
string. At some point you
will also transition from the medium lever bodies to the large size. Realize these discontinuities are
coming up and it may break the nice even line of levers you have been laying
down.
It is hard to get a nice sweeping line
of levers on some string bands than others. Some builders simply put the
levers where they work the best, damn the aesthetics. Others lay the levers down in a sweeping
curve and hope they can use the bridge pin adjustment to get them regulated
right without any buzzes. Dramatic
changes in bridge pin height (from string to string) can distract some
harpists.
Like so many other aspects of harp
building, the real trick is striking a compromise that will balance all three
demands.
Levering Treble Strings
The head on the 4mm nut driver is too
large for the tight work around the treble levers. It takes ten minutes to grind away about
60% of the wall on the tip of the 4mm driver. Do this - the smaller head makes it a much
more effective tool.
 Schematic of the 4mm. driver,
Head- on before and after
grinding.
As you proceed to the very top string,
you will find the levers moving progressively closer, towards their bridge
pin. The levers that Camac sends
for my harps not have a lower fret on the top five or six strings. At this point, the top four levers
sit right next to the bridge pin and the next three will be within a 3-5mm of
the bridge pin.
Without a lower fret to define a
“neutral position” for the bridge pin, I switch to a different
procedure for setting the initial bridge pin height. With the lever pushed all the way up
against the bridge pin, I set the height of the string so the grooved (moving)
barrel on the lever deflects the string down a millimeter as the lever is
engaged. If the bridge pin is
set too high, the string will pop the string out of its place on the bridge pin
as the moving barrel descends.
To mark the divot for the holes on the
top octave, I position the lever so it is butted up against (touching) the
brige pin. I mark the divot at the
bottom of the slots in the base of the lever. When the lever is attached to the neck,
it will just touch the bridge pin when it is shoved all the way up. It will 4-5mm away when it is pushed all
the way down.
After these are mounted most of the
adjustment is done by adjusting the height of the bridge pin. When the levers are touching the bridge
pin, you won’t be able to put the nut driver over the head, so you will
have to loosen the base screws, and slide the lever back, then adjust the
bridge pin. Slide the lever up and
retighten the screws. Repeating it
till you get it right. It is not
unusual to spend 80% of your time levering the top and bottom octaves.
Copyright ©
2007, Rick Kemper